How Much Space Do You Need Around a Dining Table?
Measure from the tabletop edge to the nearest obstruction. These starting gaps include the chair space.
Space behind the chair
The same chair needs different space for sitting, squeezing past or walking past. These examples use a 54 cm (21.3 in) occupied chair zone. Check your own furniture.
Sit down and get up
Top view · cm
- Table to wall
- 90 cm35.4 in
- Occupied chair zone
- 54 cm21.3 in
- Behind the chair
- 36 cm14.2 in
Use more space for a wider chair or more movement.
A tight squeeze
Top view · cm
- Table to wall
- 92 cm36.2 in
- Occupied chair zone
- 54 cm21.3 in
- Behind the chair
- 38 cm15.0 in
The arrow shows the narrow route behind the seated person.
Leave a walking side
Top view · cm
- Table to wall
- 120 cm47.2 in
- Occupied chair zone
- 54 cm21.3 in
- Behind the chair
- 66 cm26.0 in
The arrow shows the walking route. This is not an accessibility check.
Measure your furniture
Measure the full tabletop, including extensions. Check the chair when occupied and when pulled back.
Check space for each person
Top view · cm
- Table
- 130 × 85 cm51.2 × 33.5 in
- Space per person
- 65 cm25.6 in
- Example chair
- 44 × 48 cm17.3 × 18.9 in
Check the space between table legs. Allow elbow room as well as chair width.
Seat and table height
Side view · cm
- Seat height
- 45 cm17.7 in
- Tabletop height
- 75 cm29.5 in
- Seat to tabletop
- 30 cm11.8 in
- Clear height below apron
- 65 cm25.6 in
- Tabletop thickness
- 3 cm1.2 in
- Apron depth
- 7 cm2.8 in
Check the fitCheck thighs and armrests below the apron. This example does not meet the accessible knee-height requirement below.
Chair tucked in
Top view · cm
- Chair depth
- 48 cm18.9 in
- Table edge to chair back
- 25 cm9.8 in
A tucked chair hides the space needed to sit down and get up.
Chair pulled back
Top view · cm
- Chair depth
- 48 cm18.9 in
- Table edge to chair back
- 85 cm33.5 in
Pull your chair back far enough to stand and turn. Measure that position.
Room size
Table size + the gap on each side = dining area. Green includes chair space. These example layouts depend on chair widths and table-leg positions.
Four places
Top view · cm
- Table
- 130 × 85 cm51.2 × 33.5 in
- Left and right gaps
- 90 cm35.4 in
- Far and near gaps
- 90 cm35.4 in
- Clear dining area
- 310 × 265 cm122.0 × 104.3 in
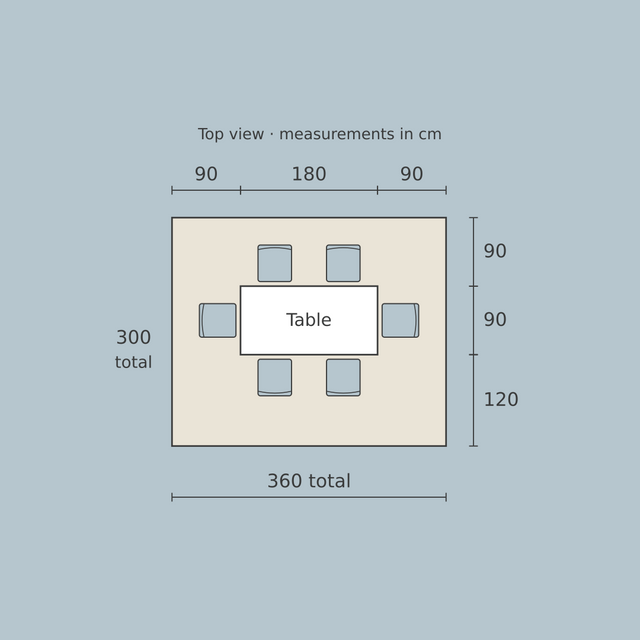
Six places and a walking side
Top view · cm
- Table
- 180 × 90 cm70.9 × 35.4 in
- Left and right gaps
- 90 cm35.4 in
- Far gap
- 90 cm35.4 in
- Near gap
- 120 cm47.2 in
- Clear dining area
- 360 × 300 cm141.7 × 118.1 in
The walking side is at the bottom of the drawing.
Eight places
Top view · cm
- Table
- 220 × 100 cm86.6 × 39.4 in
- Left and right gaps
- 90 cm35.4 in
- Far and near gaps
- 90 cm35.4 in
- Clear dining area
- 400 × 280 cm157.5 × 110.2 in
Four places at a round table
Top view · cm
- Table
- Ø 120 cm47.2 in
- Left and right gaps
- 90 cm35.4 in
- Far and near gaps
- 90 cm35.4 in
- Clear dining area
- 300 × 300 cm118.1 × 118.1 in
Obstacles and collisions
Open drawers, doors and radiators reduce the gap. Check them with the chair occupied and pulled back.
A drawer hits the chair
Top view · cm
- Table to closed cabinet
- 75 cm29.5 in
- Occupied chair
- 54 cm21.3 in
- Open drawer
- 45 cm17.7 in
- Overlap
- 24 cm9.4 in
FixMove the table 24 cm to remove the collision, then allow more room to move.
A drawer opens, but blocks passing
Top view · cm
- Table to closed cabinet
- 120 cm47.2 in
- Occupied chair
- 54 cm21.3 in
- Open drawer
- 45 cm17.7 in
- Behind the chair
- 21 cm8.3 in
Keep the walking gapAllow 165 cm from table to cabinet to keep the 120 cm walking gap with this drawer open.
Include the open door
Top view · cm
- Example door leaf
- 90 cm35.4 in
Mark the door swing, then pull the chair back. Keep the doorway approach clear.
Measure to the radiator face
Top view · cm
- Table to wall
- 120 cm47.2 in
- Radiator projection
- 15 cm5.9 in
- Usable gap
- 105 cm41.3 in
FixInclude valves and handles. Move the table 15 cm farther away to restore the 120 cm gap.
Before extending
Top view · cm
- Same room length
- 360 cm141.7 in
- Table length
- 180 cm70.9 in
- Gap at each end
- 90 cm35.4 in
Start with 90 cm at each end.
After extending
Top view · cm
- Same room length
- 360 cm141.7 in
- Table length
- 240 cm94.5 in
- Gap at each end
- 60 cm23.6 in
What changesAdding 60 cm to a centred table removes 30 cm from each end gap.
Access to the table
A wheelchair needs space to approach and room under the table. The paired drawings show selected US ADA dimensions, not a complete accessibility check or a rule for every home.
Reserve a forward approach
Top view · cm
- Clear floor space
- 76 × 122 cm30 × 48 in (US ADA)
- Toe space under table
- 43 cm17 in minimum
Keep this rectangle free of table legs. Connect one full side to an accessible route.
Keep knee and toe space clear
Side view · cm
- Example tabletop
- 75 cm29.5 in
- Clear example box
- 76 wide × 43 deep × 68.5 high cm
- US reference
- 30 wide × 17 deep × 27 high in
- Permitted tabletop range
- 71–86.5 cm28–34 in
This clear box fits the cited knee and toe profile. The earlier 65 cm apron height is too low.
Leave a way onto the bench
Top view · cm
- Example bench
- 130 × 50 cm51.2 × 19.7 in
- Example tabletop
- 130 × 85 cm51.2 × 33.5 in
- Bench-to-table gap
- 15 cm5.9 in
How to enterEnter from an open end, then slide along. The 15 cm gap is not an entrance aisle. Check that table legs do not block entry.
Will your table fit?
Enter your measurements. The plan shows collisions, short gaps and fixes that fit the selected planning targets.
Your room
Inside wall to inside wall, before subtracting the obstacle below.
Your table
Round mode checks up to four seats, one per side. Switching to round keeps at most one seat on each side.
Seats and walking side
Position, chairs and obstacles
Table position
Distances are from the walls, not the obstacle face.
Your chairs
Occupied projection = table edge to the back of the occupied chair. Pulled-back projection = table edge to chair back when getting up.
One obstacle
The tool reserves a strip along the whole wall, so a short obstacle may appear to take more space. For a door, enter its leaf width.
Enter your measurements
Blue: chairsOchre: obstacle stripRed: overlap
Targets add 36 cm (14.2 in) behind an occupied chair for seating, or 66 cm (26 in) for walking, and always allow your entered pull-back distance. A walking side without chairs uses 90 cm (35.4 in). These are planning assumptions, not legal or accessibility limits. The tool checks one rectangular room, one table, chairs and one wall strip. It does not check table legs, turning space or a complete accessible route.
Test it on the floor
- Mark the full tabletop outline with tape, including any extension.
- Place an actual chair at each side. Sit down, pull back and stand up.
- Keep someone seated while another person walks behind.
- Open nearby doors and drawers fully.
- Measure between the table legs where chairs or a wheelchair approach.
For the surrounding room, see the kitchen and dining measurements guide.
0 Comments
There are no comments for this article. Be the first one to leave a message!